Calibration and Setup
This page covers the first processing steps that usually turn a raw datacube into analysis-ready data: building an operation workflow, adding wavelength metadata, applying reflectance calibration, and checking how calibration changes the preview and spectra.
Operations
Operations are configured in the Workflow editor (#12). They are applied as a non-destructive pipeline: each operation is added to an ordered list, can be modified later, and can be enabled/disabled, removed, or reordered without changing the original datacube.
HV Explorer uses the HV SDK lazy pipeline model, so operations are only computed when their results are needed for preview, export, spectra, or model workflows. This keeps large hyperspectral datacubes responsive while you experiment with different processing steps.
Common operation categories include:
| Category | Examples |
|---|---|
| Calibration | Reflectance calibration and reference-based corrections |
| Metadata/Header information | Wavelength metadata and other datacube header information |
| Cropping/Binning | Spatial cropping, band selection, and spatial or spectral binning |
| Normalization/Filtering | SNV, smoothing, derivatives, and related preprocessing |
| Analysis/Models | PCA, ML model application, and exported model workflows |
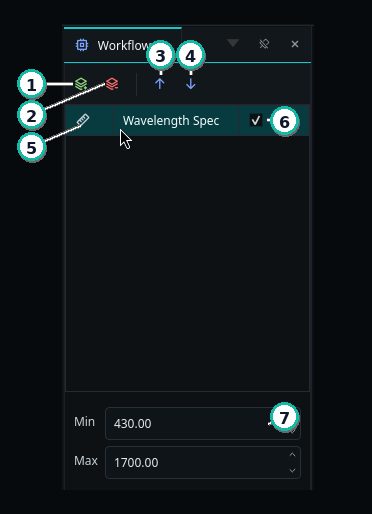
HV Explorer: Workflow editor interface
| Number | Name | Description |
|---|---|---|
| 1 | Add operation | Add a new operation to the bottom of the pipeline. |
| 2 | Remove operation | Remove the selected operation from the pipeline. |
| 3 | Move operation up | Move the selected operation earlier in the pipeline. |
| 4 | Move operation down | Move the selected operation later in the pipeline. |
| 5 | Operation list | Shows the operations in the order they will be applied. |
| 6 | Enable/disable operation | Toggle a specific operation without removing it. |
| 7 | Operation options | Configure the selected operation. The available options depend on the operation type. |
Operation order matters because each step receives the output from the previous step. Calibration and metadata operations, such as reflectance calibration or wavelength information, should usually be placed early in the pipeline so later preview, analysis, and ML steps use the corrected data.
Wavelength Spec
The Wavelength Spec operation adds wavelength metadata to a datacube when it is missing from the file header. This lets HV Explorer display spectra in nanometers, show wavelength information in the metadata panel, and enable wavelength-based preview presets such as false RGB or color infrared.
Add it from Workflow editor (#12): choose Header -> Wavelength Spec, then enter the wavelength range covered by the datacube.
For a full-range Hypervision 1700 datacube, use:
| Camera setup | Min wavelength | Max wavelength |
|---|---|---|
| HV1700 full range | 430 nm | 1700 nm |
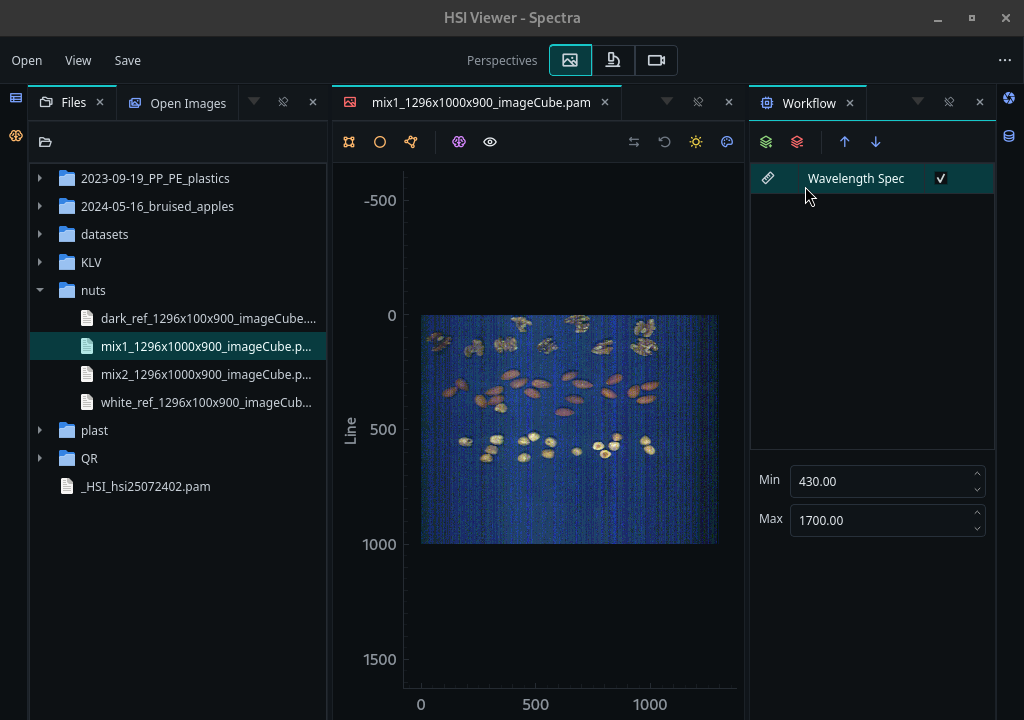
HV Explorer: Wavelength Spec
If you open the datacube with Open and Setup, the Setup Wizard can add wavelength information as part of the guided setup. Use the Wavelength Spec operation when you want to add or adjust the metadata manually.
False RGB
Once wavelength metadata is available, wavelength-based preview presets can be used from Mode and channel settings. For example, False RGB color selects bands near visible red, green, and blue wavelengths to create a near-natural-color preview.
The selected red, green, and blue bands can still be adjusted manually if you want a different visual representation of the data. The image may look noisy or color-unbalanced before reflectance calibration; this is expected for raw or uncalibrated data. Auto Brightness can improve the displayed color balance, but Reflectance calibration is the recommended way to correct illumination and sensor-response differences.
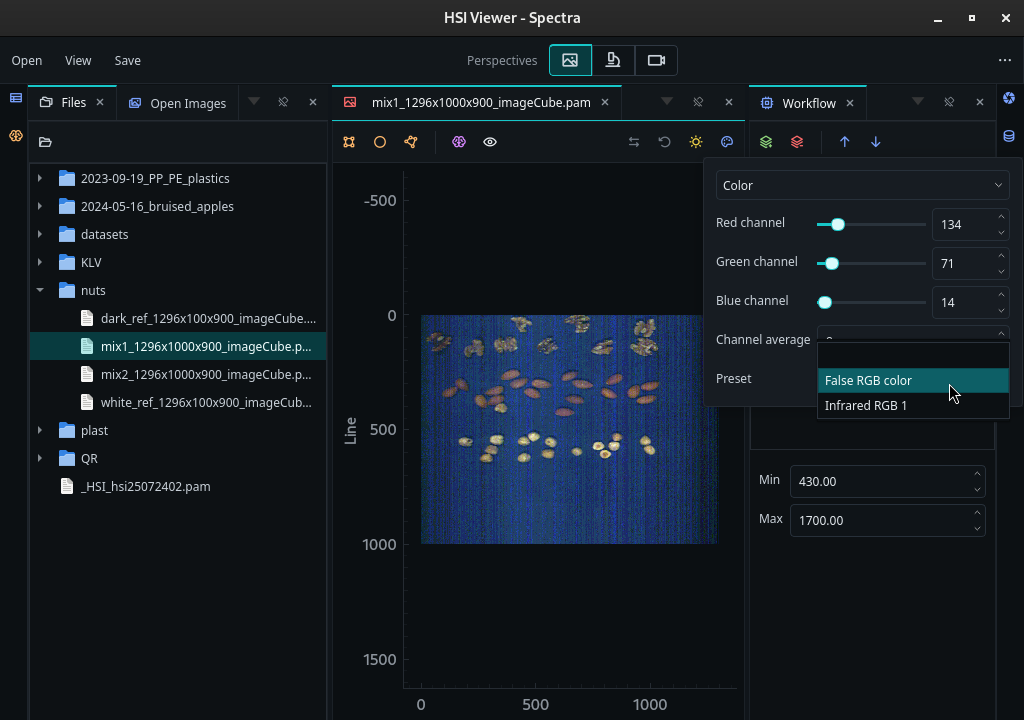
HV Explorer: false RGB color image (missing white balancing)
Demo
HV Explorer: Adding Wavelength information
Reflectance calibration
Raw HSI datacubes often have uneven illumination, sensor offsets, and wavelength dependent response. This is why the false RGB preview can look noisy or color-unbalanced before calibration. Reflectance calibration converts the raw values into an approximate reflectance scale using a white reference and a dark reference.
- White reference: provides a spatial and spectral flat-field correction. It compensates for illumination and sensitivity differences across the field of view, as well as differences in response between wavelengths. Without this correction, the same material may appear brighter in the center of the image than near the edges simply because the illumination is stronger there.
- Dark reference: corrects the black level and helps reduce sensor-pattern noise.
Capture references with the same camera setup as the sample, including exposure, gain, crop, illumination, and scanner geometry whenever possible. For a white reference, scan a spectrally uniform target such as RESTAN or another calibrated reflection standard. For a dark reference, block the incoming light completely, for example by covering the lens. See the Reflectance model section for more detail on reference acquisition and when different exposure settings require compensation.
See the Reflectance model section for a more detailed explanation of the calibration model.
Applying calibration
Open the Workflow editor (#12), add a Calibration operation, and select the reference inputs. For this example we use:
| Reference | File | Purpose |
|---|---|---|
| Dark reference | dark_ref.pam | Measures the black level/sensor offset. |
| White reference | white_ref.pam | Measures the illuminated white target. |
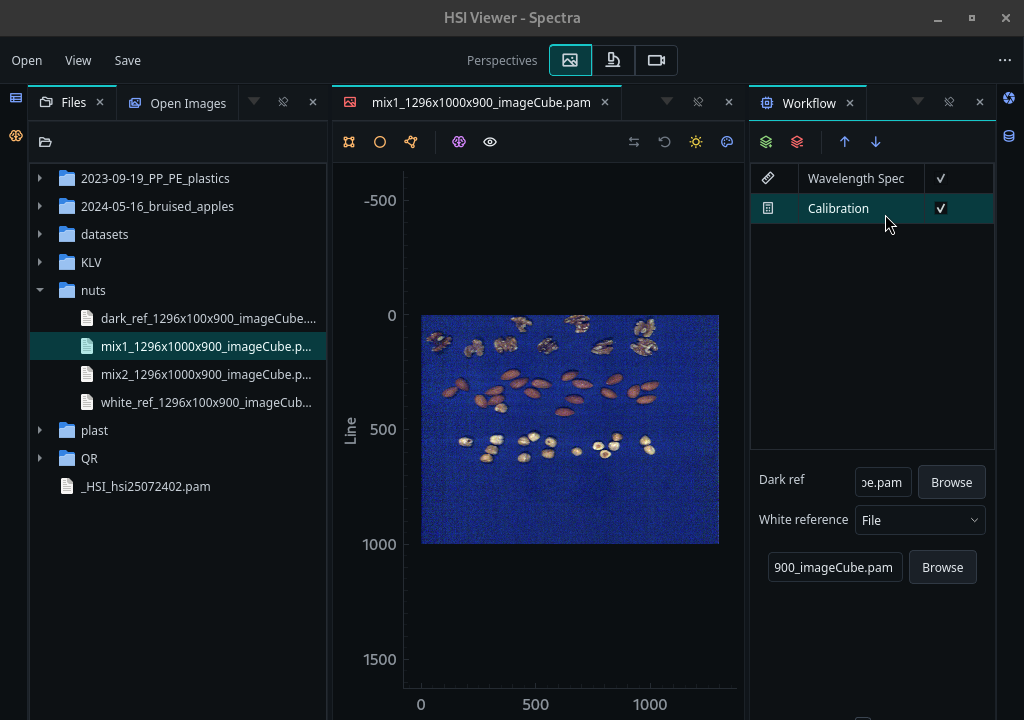
HV Explorer: reflectance calibration
The white reference can also come from a white target inside the original datacube. Select Inline instead of File, then adjust the start and end positions so they cover the white target region.
Effect on spectra
You can enable or disable the Calibration operation using its checkbox to compare the spectra before and after calibration.
With calibration disabled, the Spectral Viewer shows raw detector values. These values include the effects of illumination intensity, sensor offset, and the wavelength-dependent response of the complete imaging system.
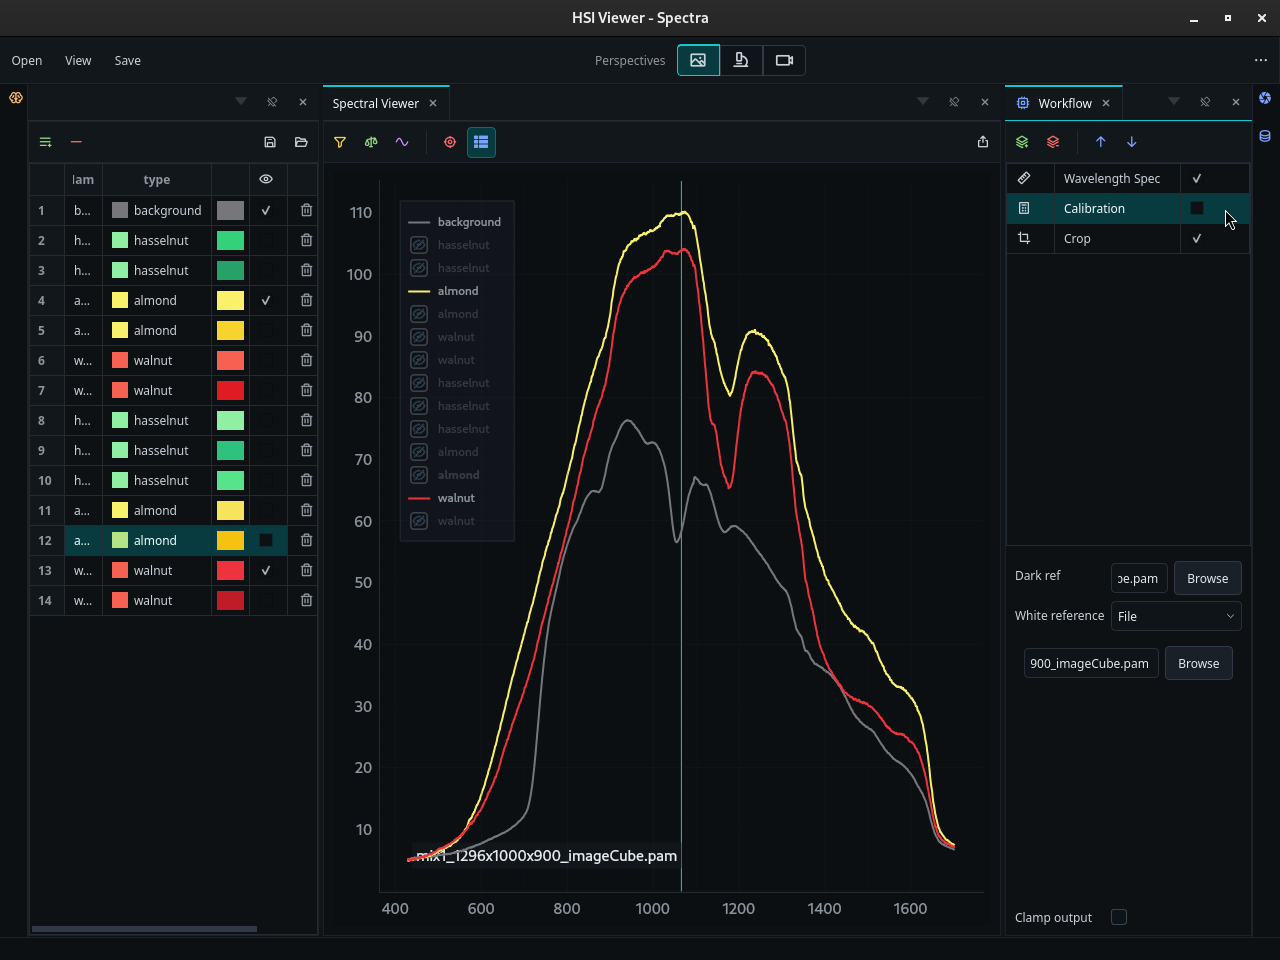
HV Explorer: spectra with reflectance calibration disabled
With calibration enabled, the same spectra are shown on an approximate reflectance scale. In particular, the white reference normalizes the measured response relative to the illumination at each spatial position and wavelength. This makes spectra from the same material more comparable across the image, including between its brighter center and darker edges. The corrected curves are therefore more suitable for sample comparison and downstream PCA or machine-learning workflows.
Here, normalizes refers to white-reference or flat-field correction. It is separate from spectral preprocessing methods such as SNV or vector normalization.
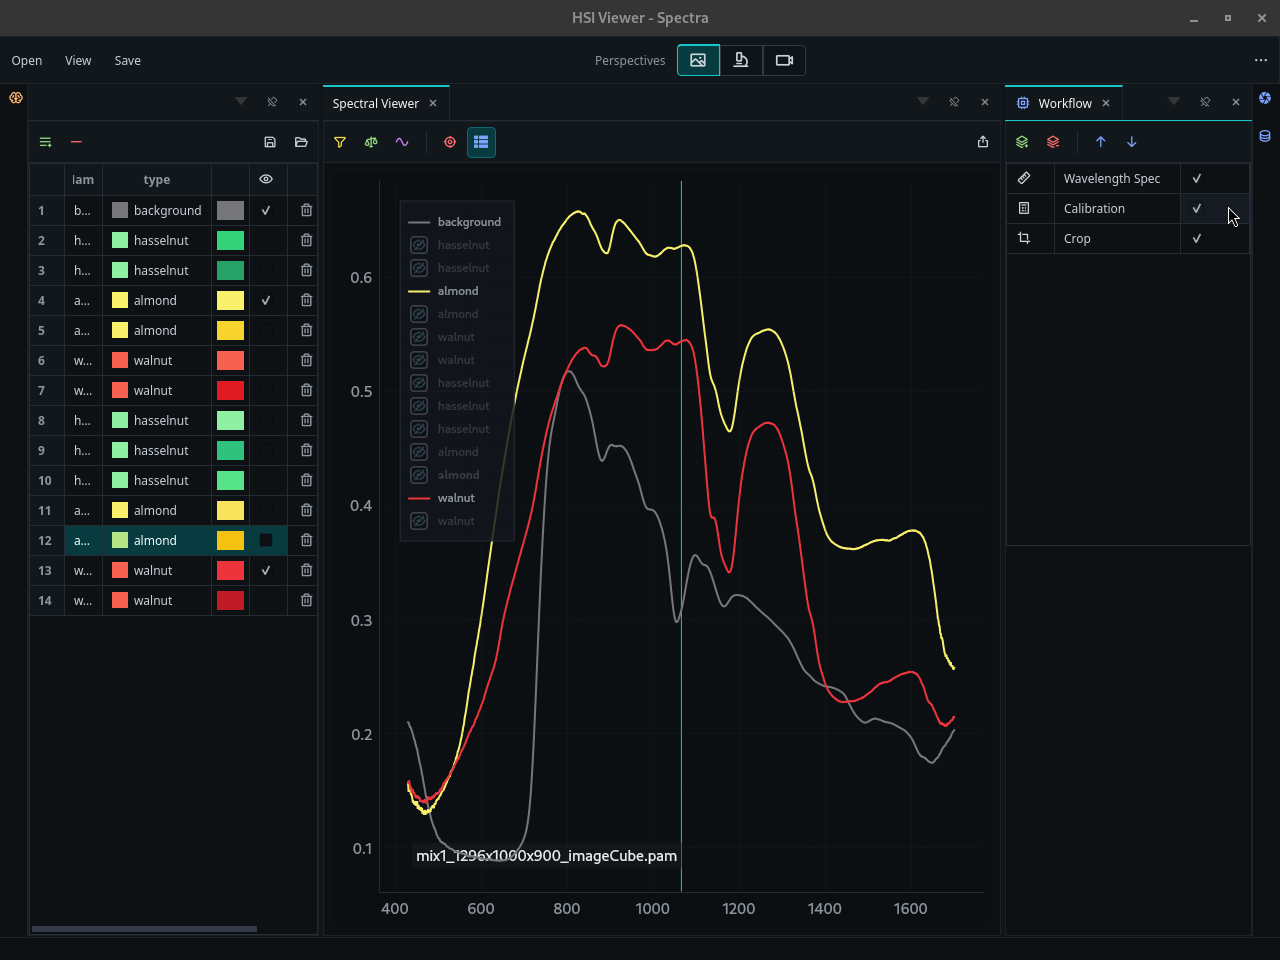
HV Explorer: spectra with reflectance calibration enabled
After calibration, the false RGB preview should also look closer to a natural color representation of the sample.
Using both white and dark references gives the best calibration. If only one reference is available, HV Explorer can still apply it: a white reference mainly improves white balance and relative spectral response, while a dark reference mainly corrects black level and reduces noise such as vertical striping.
Scaling and type conversion for export
Reflectance calibration changes the datacube from the original integer type to
32-bit floating-point values clipped to the range [0, 1]. You can verify this
in the Metadata inspector (#13).
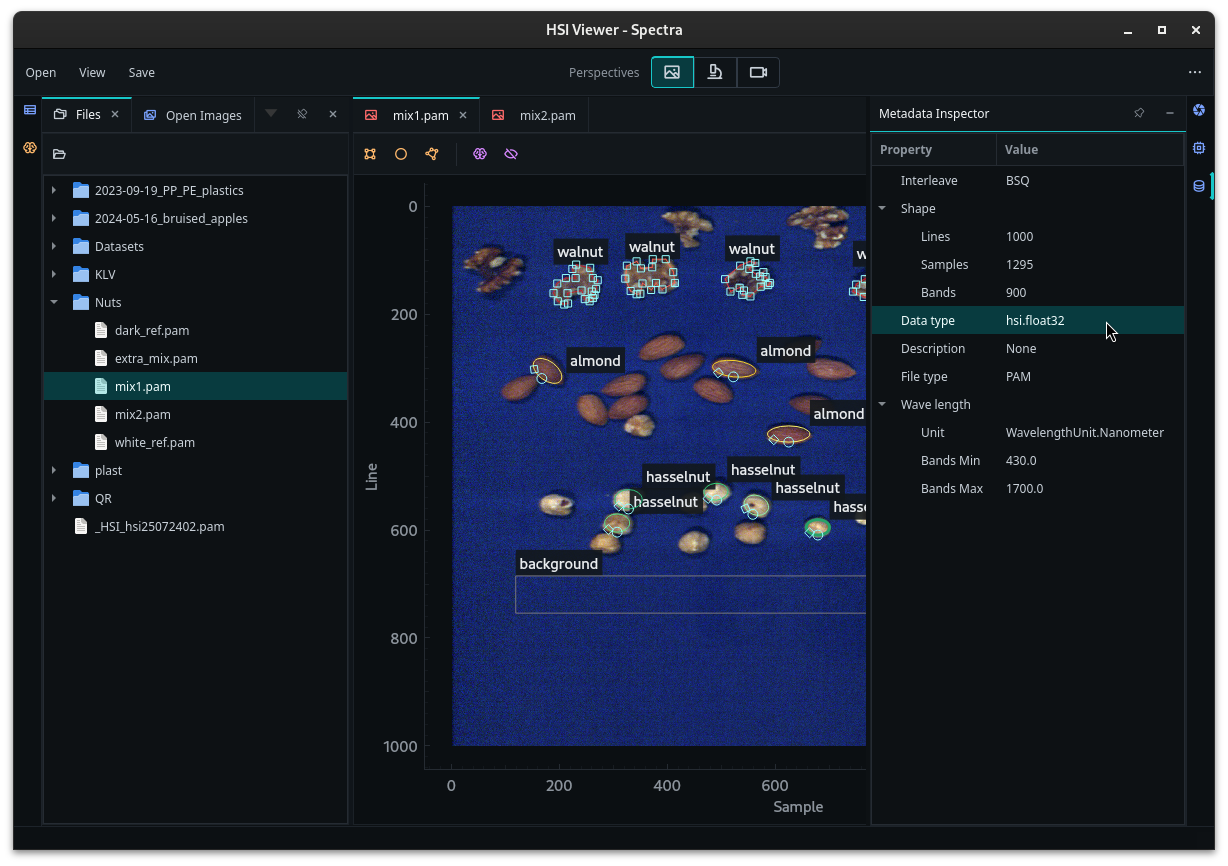
HV Explorer: 32-bit float datatype
If the calibrated datacube will be exported to a format that requires integer data, such as PAM, the values must be both scaled and converted to an integer data type. The Scaling operation performs both steps: it multiplies the values by the selected scale factor and then converts the result to the selected target data type.
| Target type | Scale value | Notes |
|---|---|---|
uint8 | 255 | Maps [0, 1] to [0, 255]; compact output with lower precision. |
uint16 | 65535 | Maps [0, 1] to [0, 65535]; preserves more precision but creates larger files. |
Use DType Change instead only when the data type should change without
rescaling the numerical values. Do not apply DType Change directly from
float32 reflectance to an integer type: values between 0 and 1 would be
truncated and most spectral information would be lost.
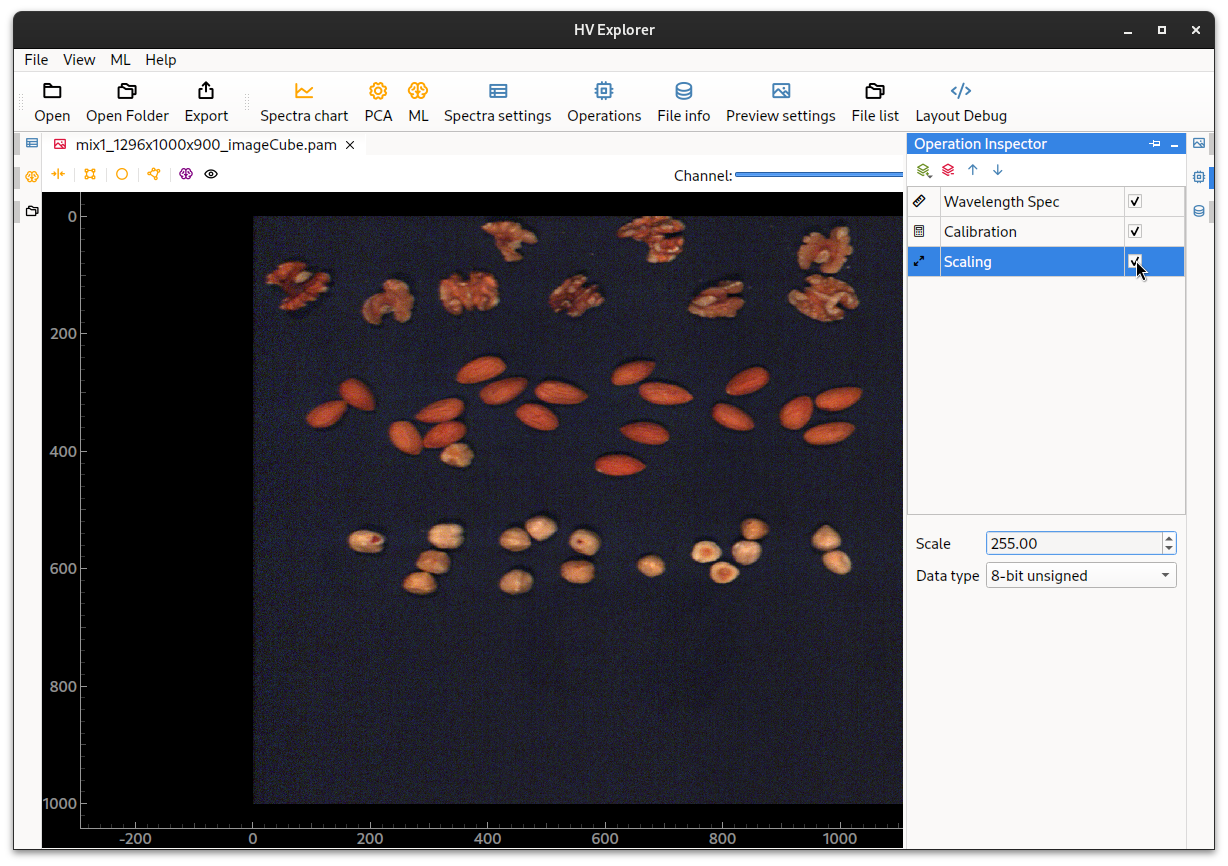
HV Explorer: reflectance calibration (after scaling)
Use the checkbox next to an operation to enable or disable it without removing it. To remove an operation completely, select it and click the red minus button in the Workflow editor toolbar.
Demo
HV Explorer: Reflectance calibration
Setup Wizard shortcut
This section shows the guided alternative to manually adding Wavelength Spec and Reflectance calibration operations.
The Setup Wizard is a guided shortcut for the two setup steps that are often needed before analysis: adding wavelength metadata and applying reflectance calibration. It is useful when opening raw datacubes that do not already contain complete wavelength information or calibrated reflectance values.
Open it by choosing Open and Setup from the Open Menu (#1), or by right-clicking a file in the Files list (#8) and choosing Open with Setup.
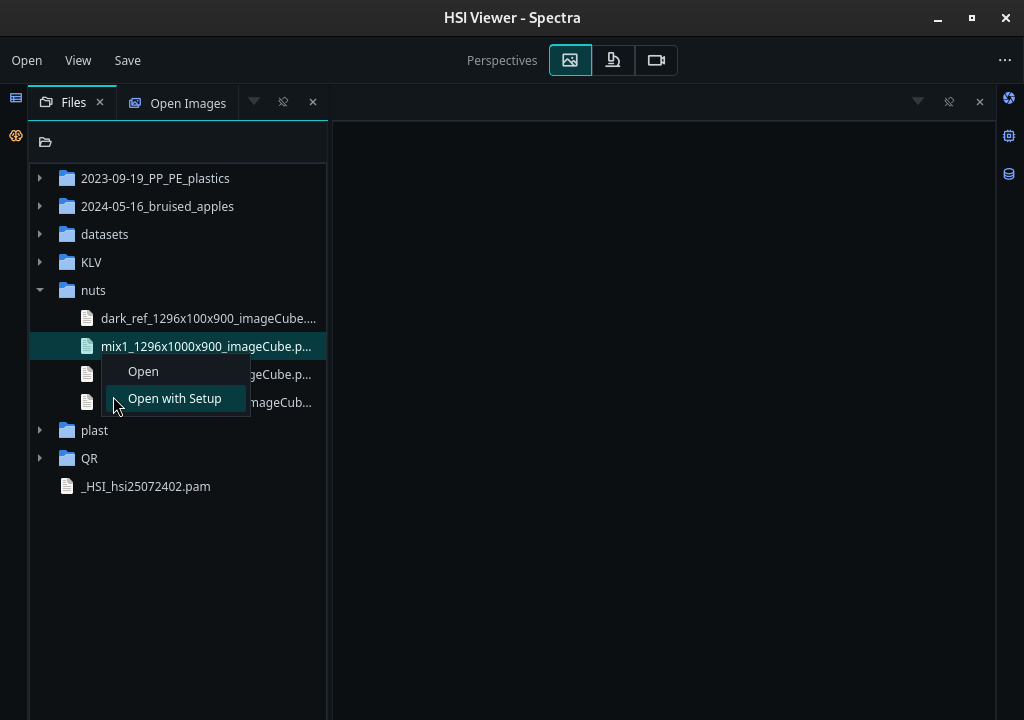
HV Explorer: open with setup
First, select the camera model. HV Explorer uses this to determine the wavelength range for the datacube.
| Camera model | Use when |
|---|---|
| HV 1000 | The datacube was captured with an HV1000 setup. |
| HV 1700 | The datacube was captured with an HV1700 setup. |
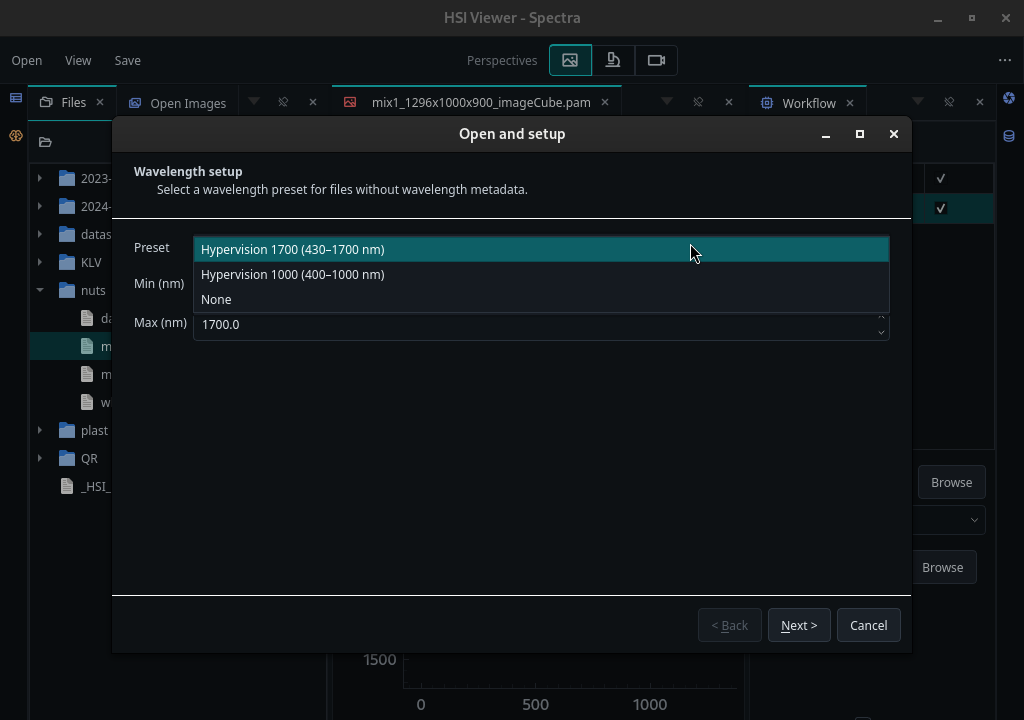
HV Explorer: setup wizard - camera type
Next, choose the reference inputs for reflectance calibration. The dark reference must be a separate file. The white reference can either be a separate file or an inline white target region inside the datacube.
| Reference | Options | Notes |
|---|---|---|
| Dark reference | File | Measures the black level/sensor offset. |
| White reference | File or inline region | Measures the illuminated white target used for reflectance scaling. |
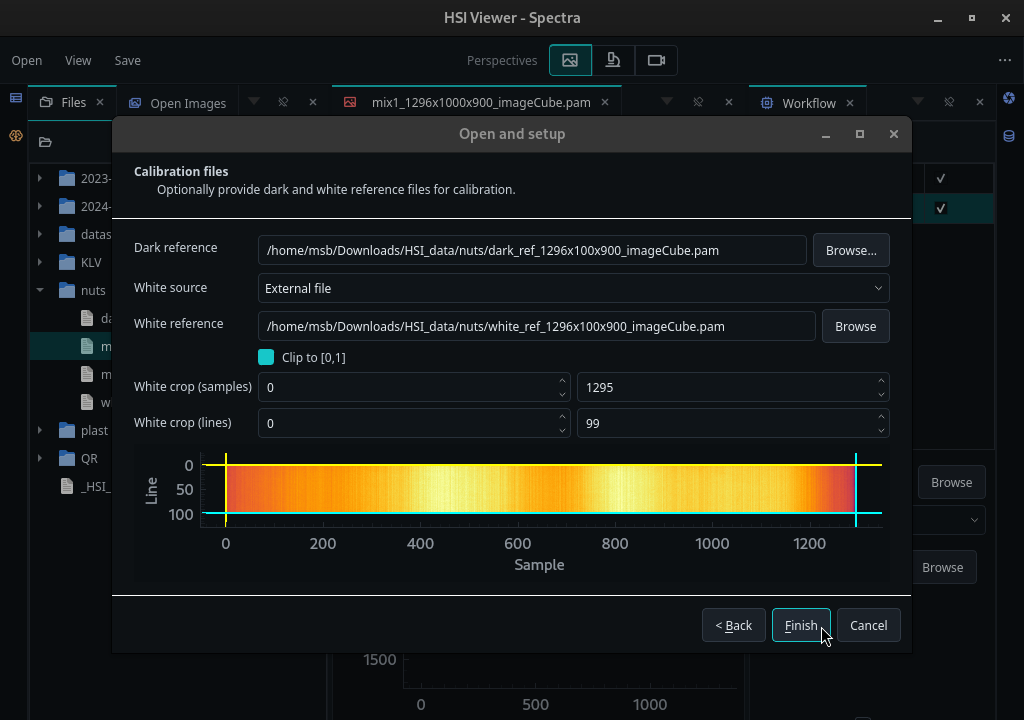
HV Explorer: setup wizard - calibration
After the wizard finishes, HV Explorer opens the datacube with the corresponding wavelength and calibration operations already added to the Workflow editor. You can still inspect, disable, reorder, or adjust those operations afterwards.
When opened with the Setup Wizard, the preview starts in Color mode using
the False RGB preset. When opened normally, it starts in Gray mode,
showing the middle band with the default inferno color map.
You can change either preview using the
Mode and channel settings
described under Preview Settings.
The Setup Wizard creates the same kind of processing steps described in Wavelength Spec and Reflectance calibration. It simply collects the common choices in one guided flow so the setup is faster and less error-prone.
Demo
HV Explorer: Setup wizard